You tell me I'm wrong. Then you'd better prove you're right.

2023-12-29
【转载】使用 Elasticsearch 做一个好用的日语搜索引擎及自动补全

【编者按】此文转载自 https://avnpc.com/。由于原网站链接已经失效,但此文内容非常有价值,故本博客对此文及其相关链接全文转载。本文著作权由 AlloVince 所有。

@[toc]

最近基于 Elastic Stack 搭建了一个日语搜索服务,发现日文的搜索相比英语和中文,有不少特殊之处,因此记录下用 Elasticsearch 搭建日语搜索引擎的一些要点。本文所有的示例,适用于 Elastic 6.X 及 7.X 版本。

日语搜索的特殊性

以 Elastic 的介绍语「Elasticsearchは、予期した結果や、そうでないものも検索できるようにデータを集めて格納するElastic Stackのコア製品です」为例。作为搜索引擎,当然希望用户能通过句子中的所有主要关键词,都能搜索到这条结果。

和英文一样,日语的动词根据时态语境等,有多种变化。如例句中的「集めて」表示现在进行时,属于动词的连用形的て形,其终止形(可以理解为动词的原型)是「集める」。一个日文动词可以有 10 余种活用变形。如果依赖单纯的分词,用户在搜索「集める」时将无法匹配到这个句子。

除动词外,日语的形容词也存在变形,如终止形「安い」可以有连用形「安く」、未然性「安かろ」、仮定形「安けれ」等多种变化。

和中文一样,日文中存在多音词,特别是人名、地名等,如「相楽」在做人名和地名时就有 Sagara、Soraku、Saganaka 等不同的发音。

同时日文中一个词还存在不同的拼写方式,如「空缶」 = 「空き缶」。

而作为搜索引擎,输入补全也是很重要的一个环节。从日语输入法来看,用户搜索时输入的形式也是多种多样,存在以下的可能性:

  • 平假名, 如「検索 -> けんさく」
  • 片假名全角,如 「検索 -> ケンサク」
  • 片假名半角,如「検索 -> ケンサク」
  • 汉字,如 「検索」
  • 罗马字全角,如「検索 -> kennsaku」
  • 罗马字半角,如「検索 -> kennsaku」

等等。这和中文拼音有点类似,在用户搜索结果或者做输入补全时,我们也希望能尽可能适应用户的输入习惯,提升用户体验。

Elasticsearch 文本索引的过程

Elasticsearch (下文简称 ES)作为一个比较成熟的搜索引擎,对上述这些问题,都有了一些解决方法

先复习一下 ES 的文本在进行索引时将经历哪些过程,将一个文本存入一个字段 (Field) 时,可以指定唯一的分析器(Analyzer),Analyzer 的作用就是将源文本通过过滤、变形、分词等方式,转换为 ES 可以搜索的词元(Term),从而建立索引,即:

graph LR  
 Text --> Analyzer 
 Analyzer --> Term

一个 Analyzer 内部,又由 3 部分构成

enter image description here

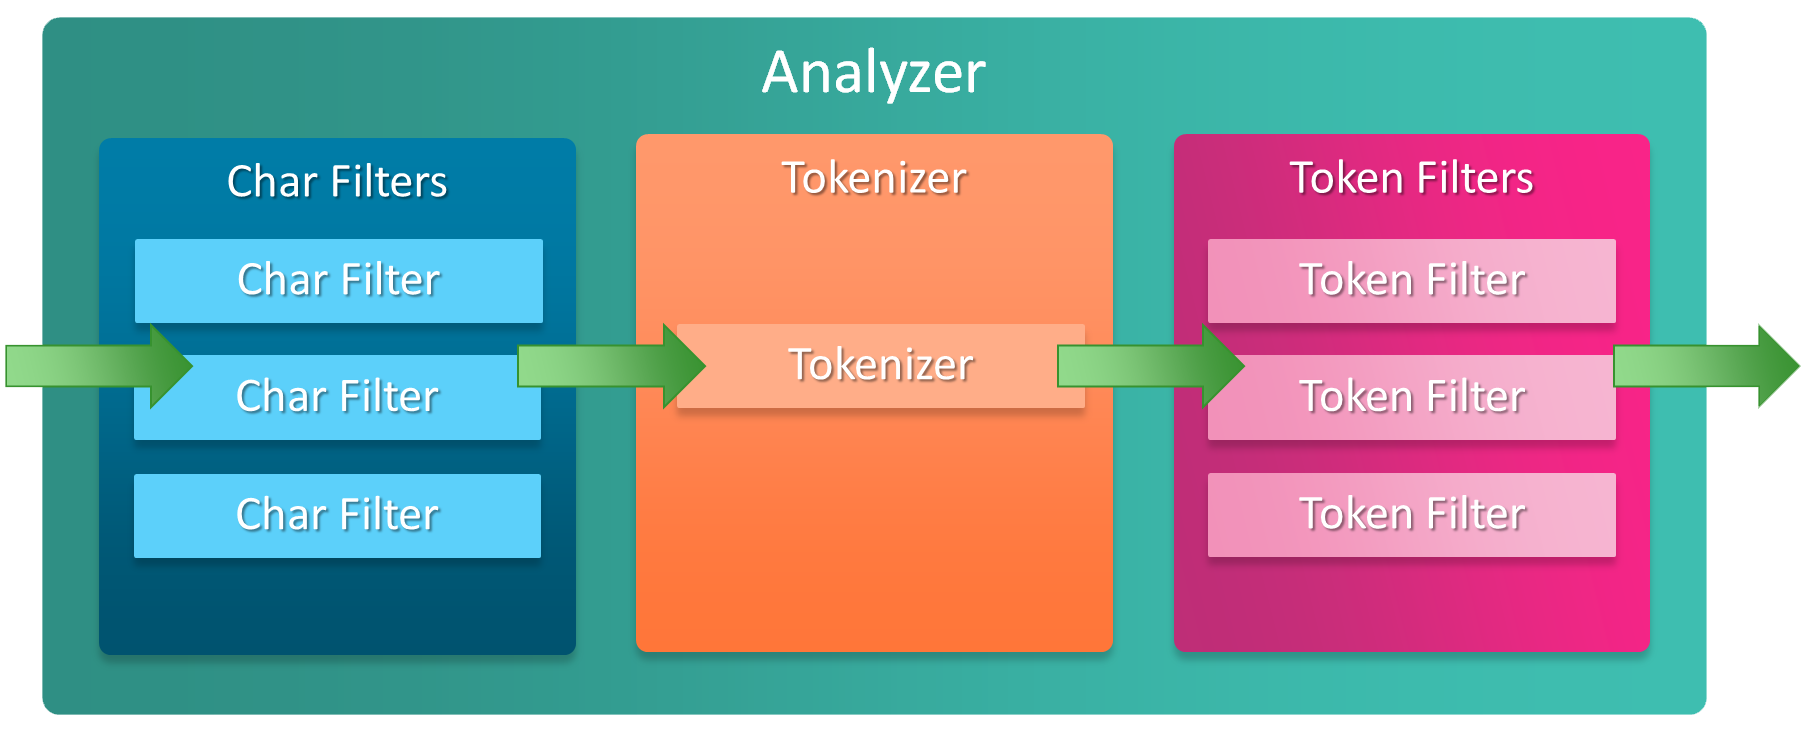
  • 字符过滤器 (Character Filter): ,对文本进行字符过滤处理,如处理文本中的 html 标签字符。一个 Analyzer 中可包含 0 个或多个字符过滤器,多个按配置顺序依次进行处理。
  • 分词器 (Tokenizer): 对文本进行分词。一个 Analyzer 必需且只可包含一个 Tokenizer。
  • 词元过滤器 (Token filter): 对 Tokenizer 分出的词进行过滤处理。如转小写、停用词处理、同义词处理等。一个 Analyzer 可包含 0 个或多个词项过滤器,多个按配置顺序进行过滤。

引用一张图说明应该更加形象

ES 已经内置了一些 Analyzers,但显然对于日文搜索这种较复杂的场景,一般需要根据需求创建自定义的 Analyzer。

另外 ES 还有归一化处理器 (Normalizers)的概念,可以将其理解为一个可以复用的 Analyzers, 比如我们的数据都是来源于英文网页,网页中的 html 字符,特殊字符的替换等等处理都是基本相同的,为了避免将这些通用的处理在每个 Analyzer 中都定义一遍,可以将其单独整理为一个 Normalizer。

快速测试 Analyzer

为了实现好的搜索效果,无疑会通过多种方式调整 Analyzer 的配置,为了更有效率,应该优先掌握快速测试 Analyzer 的方法, 这部分内容详见如何快速测试 Elasticsearch 的 Analyzer, 此处不再赘述。

Elasticsearch 日语分词器 (Tokenizer) 的比较与选择

日语分词是一个比较大的话题,因此单独开了一篇文章介绍和比较主流的开源日语分词项目。引用一下最终的结论

算法/模型 实现语言 词典 处理速度 ES 插件 Lisence
MeCab CRF C++ 可选 最高 GPL/LGPL/BSD
Kuromoji Viterbi Java 可选, 默认 ipadic 内置 Apache License v2.0
Juman++ RNNLM C++ 自制 Apache License v2.0
KyTea SVM 等 C++ UniDic Apache License v2.0
Sudachi Lattice LSTM Java UniDic + NEologd Apache License v2.0
nagisa Bi-LSTM Python ipadic MIT

对于 Elasticsearch,如果是项目初期,由于缺少数据,对于搜索结果优化还没有明确的目标,建议直接使用 Kuromoji 或者 Sudachi,安装方便,功能也比较齐全。项目中后期,考虑到分词质量和效率的优化,可以更换为 MeCab 或 Juman++。 本文将以 Kuromoji 为例。

日语搜索相关的 Token Filter

在 Tokenizer 已经确定的基础上,日语搜索其他的优化都依靠 Token filter 来完成,这其中包括 ES 内置的 Token filter 以及 Kuromoji 附带的 Token filter,以下逐一介绍

Lowercase Token Filter (小写过滤)

将英文转为小写, 几乎任何大部分搜索的通用设置

1
2
3
4
5
6
7
8
9
10
11
12
13
14
15
16
17
18
19
POST _analyze
{
"tokenizer": "kuromoji_tokenizer",
"filter": ["lowercase"],
"text": "Ironman"
}

Response
{
"tokens": [
{
"token": "ironman",
"start_offset": 0,
"end_offset": 7,
"type": "word",
"position": 0
}
]
}

CJK Width Token Filter (CJK 宽度过滤)

将全角 ASCII 字符 转换为半角 ASCII 字符

1
2
3
4
5
6
7
8
9
10
11
12
13
14
15
16
17
18
POST _analyze
{
"tokenizer": "kuromoji_tokenizer",
"filter": ["cjk_width"],
"text": "kennsaku"
}

{
"tokens": [
{
"token": "kennsaku",
"start_offset": 0,
"end_offset": 8,
"type": "word",
"position": 0
}
]
}

以及将半角片假名转换为全角

1
2
3
4
5
6
7
8
9
10
11
12
13
14
15
16
17
18
POST _analyze
{
"tokenizer": "kuromoji_tokenizer",
"filter": ["cjk_width"],
"text": "ケンサク"
}

{
"tokens": [
{
"token": "ケンサク",
"start_offset": 0,
"end_offset": 4,
"type": "word",
"position": 0
}
]
}

ja_stop Token Filter (日语停止词过滤)

一般来讲,日语的停止词主要包括部分助词、助动词、连接词及标点符号等,Kuromoji 默认使用的停止词参考lucene 日语停止词源码。 在此基础上也可以自己在配置中添加停止词

1
2
3
4
5
6
7
8
9
10
11
12
13
14
15
16
17
18
19
20
21
22
23
24
25
26
27
28
29
30
31
32
POST _analyze
{
"tokenizer": "kuromoji_tokenizer",
"filter": ["ja_stop"],
"text": "Kuromojiのストップワード"
}

{
"tokens": [
{
"token": "Kuromoji",
"start_offset": 0,
"end_offset": 8,
"type": "word",
"position": 0
},
{
"token": "ストップ",
"start_offset": 9,
"end_offset": 13,
"type": "word",
"position": 2
},
{
"token": "ワード",
"start_offset": 13,
"end_offset": 16,
"type": "word",
"position": 3
}
]
}

kuromoji_baseform Token Filter (日语词根过滤)

将动词、形容词转换为该词的词根

1
2
3
4
5
6
7
8
9
10
11
12
13
14
15
16
17
18
POST _analyze
{
"tokenizer": "kuromoji_tokenizer",
"filter": ["kuromoji_baseform"],
"text": "飲み"
}

{
"tokens": [
{
"token": "飲む",
"start_offset": 0,
"end_offset": 2,
"type": "word",
"position": 0
}
]
}

kuromoji_readingform Token Filter (日语读音过滤)

将单词转换为发音,发音可以是片假名或罗马字 2 种形式

1
2
3
4
5
6
7
8
9
10
11
12
13
14
15
16
17
18
POST _analyze
{
"tokenizer": "kuromoji_tokenizer",
"filter": ["kuromoji_readingform"],
"text": "寿司"
}

{
"tokens": [
{
"token": "スシ",
"start_offset": 0,
"end_offset": 2,
"type": "word",
"position": 0
}
]
}
1
2
3
4
5
6
7
8
9
10
11
12
13
14
15
16
17
18
19
20
POST _analyze
{
"tokenizer": "kuromoji_tokenizer",
"filter": [{
"type": "kuromoji_readingform", "use_romaji": true
}],
"text": "寿司"
}

{
"tokens": [
{
"token": "sushi",
"start_offset": 0,
"end_offset": 2,
"type": "word",
"position": 0
}
]
}

当遇到多音词时,读音过滤仅会给出一个读音。

kuromoji_part_of_speech Token Filter (日语语气词过滤)

语气词过滤与停止词过滤有一定重合之处,语气词过滤范围更广。停止词过滤的对象是固定的词语列表,停止词过滤则是根据词性过滤的,具体过滤的对象参考源代码

1
2
3
4
5
6
7
8
9
10
11
12
13
14
15
16
17
18
19
20
21
22
23
24
25
POST _analyze
{
"tokenizer": "kuromoji_tokenizer",
"filter": ["kuromoji_part_of_speech"],
"text": "寿司がおいしいね"
}

{
"tokens": [
{
"token": "寿司",
"start_offset": 0,
"end_offset": 2,
"type": "word",
"position": 0
},
{
"token": "おいしい",
"start_offset": 3,
"end_offset": 7,
"type": "word",
"position": 2
}
]
}

kuromoji_stemmer Token Filter (日语长音过滤)

去除一些单词末尾的长音, 如「コンピューター」 => 「コンピュータ」

1
2
3
4
5
6
7
8
9
10
11
12
13
14
15
16
17
18
POST _analyze
{
"tokenizer": "kuromoji_tokenizer",
"filter": ["kuromoji_stemmer"],
"text": "コンピューター"
}

{
"tokens": [
{
"token": "コンピュータ",
"start_offset": 0,
"end_offset": 7,
"type": "word",
"position": 0
}
]
}

kuromoji_number Token Filter (日语数字过滤)

将汉字的数字转换为 ASCII 数字

1
2
3
4
5
6
7
8
9
10
11
12
13
14
15
16
17
18
POST _analyze
{
"tokenizer": "kuromoji_tokenizer",
"filter": ["kuromoji_number"],
"text": "一〇〇〇"
}

{
"tokens": [
{
"token": "1000",
"start_offset": 0,
"end_offset": 4,
"type": "word",
"position": 0
}
]
}

日语全文检索 Analyzer 配置

基于上述这些组件,不难得出一个完整的日语全文检索 Analyzer 配置

1
2
3
4
5
6
7
8
9
10
11
12
13
14
15
16
17
18
19
20
21
22
23
24
25
26
27
28
29
30
31
PUT my_index
{
"settings": {
"analysis": {
"analyzer": {
"ja_fulltext_analyzer": {
"type": "custom",
"tokenizer": "kuromoji_tokenizer",
"filter": [
"cjk_width",
"lowercase",
"kuromoji_stemmer",
"ja_stop",
"kuromoji_part_of_speech",
"kuromoji_baseform"
]
}
}
}
},
"mappings": {
"my_type": {
"properties": {
"title": {
"type": "text",
"analyzer": "ja_fulltext_analyzer"
}
}
}
}
}

其实这也正是 kuromoji analyzer 所使用的配置,因此上面等价于

1
2
3
4
5
6
7
8
9
10
11
12
13
PUT my_index
{
"mappings": {
"my_type": {
"properties": {
"title": {
"type": "text",
"analyzer": "kuromoji"
}
}
}
}
}

这样的默认设置已经可以应对一般情况,采用默认设置的主要问题是词典未经打磨,一些新词语或者专业领域的分词不准确,如「東京スカイツリー」期待的分词结果是 「東京/スカイツリー」,实际分词结果是「東京/スカイ/ツリー」。进而导致一些搜索排名不够理想。这个问题可以将词典切换到 UniDic + NEologd,能更多覆盖新词及网络用语,从而得到一些改善。同时也需要根据用户搜索,不断维护自己的词典。而自定义词典,也能解决一词多拼以及多音词的问题。

至于本文开始提到的假名读音匹配问题,很容易想到加入 kuromoji_readingform,这样索引最终存储的 Term 都是假名形式,确实可以解决假名输入的问题,但是这又会引发新的问题:

一方面,kuromoji_readingform 所转换的假名读音并不一定准确,特别是遇到一些不常见的拼写,比如「明るい」-> 「アカルイ」正确,「明るい」的送りがな拼写「明かるい」就会转换为错误的「メイ・カルイ」

另一方面,日文中相同的假名对应不同汉字也是极为常见,如「シアワセ」可以写作「幸せ」、「仕合わせ」等。

因此kuromoji_readingform并不适用于大多数场景,在输入补全,以及已知读音的人名、地名等搜索时,可以酌情加入。

日语自动补全的实现

Elasticsearch 的补全(Suggester)有 4 种:Term Suggester 和 Phrase Suggester 是根据输入查找形似的词或词组,主要用于输入纠错,常见的场景是”你是不是要找 XXX”;Context Suggester 个人理解一般用于对自动补全加上其他字段的限定条件,相当于 query 中的 filter;因此这里着重介绍最常用的 Completion Suggester。

Completion Suggester 需要响应每一个字符的输入,对性能要求非常高,因此 ES 为此使用了新的数据结构:完全装载到内存的 FST(In Memory FST), 类型为 completion。众所周知,ES 的数据类型主要采用的是倒排索引(Inverse Index), 但由于 Term 数据量非常大,又引入了 term dictionary 和 term index,因此一个搜索请求会经过以下的流程。

graph LR  
 TI[Term Index]
 TD[Term Dictionary]
 PL[Posting List]
 Query --> TI 
 TI --> TD
 TD --> Term
 Term --> PL
 PL --> Documents

completion 则省略了 term dictionary 和 term index,也不需要从多个 nodes 合并结果,仅适用内存就能完成计算,因此性能非常高。但由于仅使用了 FST 一种数据结构,只能实现前缀搜索。

了解了这些背景知识,来考虑一下如何构建日语的自动补全。

和全文检索不同,在自动补全中,对读音和罗马字的匹配有非常强的需求,比如用户在输入「銀魂」。按照用户的输入顺序,实际产生的字符应当是

  • gin
  • ぎん
  • 銀 t
  • 銀 tama
  • 銀魂

理想状况应当让上述的所有输入都能匹配到「銀魂」,那么如何实现这样一个自动补全呢。常见的方法是针对汉字、假名、罗马字各准备一个字段,在输入时同时对 3 个字段做自动补全,然后再合并补全的结果。

来看一个实际的例子, 下面建立的索引中,创建了 2 种 Token Filter,kuromoji_readingform可以将文本转换为片假名,romaji_readingform则可以将文本转换为罗马字,将其与kuromoji Analyzer 组合,就得到了对应的自定义 Analyzer ja_reading_analyzerja_romaji_analyzer

对于 title 字段,分别用不同的 Analyzer 进行索引:

  • title: text 类型,使用 kuromoji Analyzer, 用于普通关键词搜索
  • title.suggestion: completion 类型, 使用 kuromoji Analyzer,用于带汉字的自动补全
  • title.reading: completion 类型, 使用 ja_reading_analyzer Analyzer,用于假名的自动补全
  • title.romaji: completion 类型, 使用 ja_romaji_analyzer Analyzer,用于罗马字的自动补全
1
2
3
4
5
6
7
8
9
10
11
12
13
14
15
16
17
18
19
20
21
22
23
24
25
26
27
28
29
30
31
32
33
34
35
36
37
38
39
40
41
42
43
44
45
46
47
48
49
50
51
52
53
54
55
56
57
58
59
60
61
62
63
64
65
66
67
68
69
70
71
72
73
74
75
76
77
78
PUT my_index
{
"settings": {
"analysis": {
"filter": {
"katakana_readingform": {
"type": "kuromoji_readingform",
"use_romaji": "false"
},
"romaji_readingform": {
"type": "kuromoji_readingform",
"use_romaji": "true"
}
},
"analyzer": {
"ja_reading_analyzer": {
"type": "custom",
"filter": [
"cjk_width",
"lowercase",
"kuromoji_stemmer",
"ja_stop",
"kuromoji_part_of_speech",
"kuromoji_baseform",
"katakana_readingform"
],
"tokenizer": "kuromoji_tokenizer"
},
"ja_romaji_analyzer": {
"type": "custom",
"filter": [
"cjk_width",
"lowercase",
"kuromoji_stemmer",
"ja_stop",
"kuromoji_part_of_speech",
"kuromoji_baseform",
"romaji_readingform"
],
"tokenizer": "kuromoji_tokenizer"
}
}
}
},
"mappings": {
"my_type": {
"properties": {
"title": {
"type": "text",
"analyzer": "kuromoji",
"fields": {
"reading": {
"type": "completion",
"analyzer": "ja_reading_analyzer",
"preserve_separators": false,
"preserve_position_increments": false,
"max_input_length": 20
},
"romaji": {
"type": "completion",
"analyzer": "ja_romaji_analyzer",
"preserve_separators": false,
"preserve_position_increments": false,
"max_input_length": 20
},
"suggestion": {
"type": "completion",
"analyzer": "kuromoji",
"preserve_separators": false,
"preserve_position_increments": false,
"max_input_length": 20
}
}
}
}
}
}
}

插入示例数据

1
2
3
POST _bulk
{ "index": { "_index": "my_index", "_type": "my_type", "_id": 1} }
{ "title": "銀魂" }

然后运行自动补全的查询

1
2
3
4
5
6
7
8
9
10
11
12
13
14
15
16
17
18
19
20
21
22
23
24
25
26
GET my_index/_search
{
"suggest": {
"title": {
"prefix": "gin",
"completion": {
"field": "title.suggestion",
"size": 20
}
},
"titleReading": {
"prefix": "gin",
"completion": {
"field": "title.reading",
"size": 20
}
},
"titleRomaji": {
"prefix": "gin",
"completion": {
"field": "title.romaji",
"size": 20
}
}
}
}

可以看到不同输入的命中情况

  • gin: 命中 title.romaji
  • ぎん: 命中 title.readingtitle.romaji
  • 銀: 命中 title.suggestion, title.readingtitle.romaji
  • 銀 t: 命中 title.romaji
  • 銀たま: 命中 title.readingtitle.romaji
  • 銀魂: 命中 title.suggestion, title.readingtitle.romaji

References

2023-12-29
【转载】日语分词器的介绍与比较

【编者按】此文转载自 https://avnpc.com/。由于原网站链接已经失效,但此文内容非常有价值,故本博客对此文及其相关链接全文转载。本文著作权由 AlloVince 所有。

对于搜索引擎来说,分词器的质量是对搜索结果影响最大的一个环节,日语分词(形態素解析)经过多年的发展也有了一些比较成熟的分词系统,下面介绍并比较目前主流的开源日语分词系统

日语分词词典

在介绍分词器之前,有必要先介绍词典,因为词典是分词的基础,词典的质量直接决定了分词器的质量,而分词系统内部采用哪个词典,也是对分词器效果评估的重要参考。

说到日文词典,可能首先想到是知名的商业词典,如「広辞苑」、「大辞林」等,然而由于商业词典等存在版权和授权问题,一般都无法用于开源项目。其次这类商业词典一般以词义解释为主,而对于分词来说,词汇的释义并不是最重要的,而是词性、词根等,所以也并不是所有的商业词典都适用于分词。

因此开源项目一般都采用具备开源许可证的免费词典,目前使用比较多的有:

  • UniDic: 由国立国语研究所推出,主要用于分词问题研究的词典,质量非常优秀,并且按照现代、近代、古代,书面语、口语等划分了多个专门词典,License 也有 GPL/LGPL/BSD 多个选择,可以说是日语分词研究的首选词典了。
  • ipadic: 这个词典首先是由「奈良先端科学技術大学院大学松本研究室」所开发的分词软件 ChaSen 整理并使用的,词汇的来源是「情報処理振興事業協会(IPA)」所编著的「IPA 品詞体系(THiMCO97)」,由于 ChaSen 这个软件已经停止更新,因此这个词典的最后一个版本也停止在 2.7.0,更新时间是 2007 年。从应用角度来看 ipadic 并不适合使用在实际产品中,但是胜在体积小巧,适合用于个人学习或 demo,总词条数约 14W 条。
  • NAIST-jdic : 由于 ipadic 停止更新,NAIST-jdic 就是在 ipadic 继续整理并将词条数增补至 30W,许可证 BSD。最后更新时间为 2008 年。
  • mecab-ipadic / mecab-jumandic 由知名项目 MeCab (下文详细介绍) 按照自己项目的格式整理而成的词典
  • mecab-ipadic-NEologd 由工程师 @overlast 个人维护的项目,并得到的 LINE 公司的赞助,主要在 mecab-ipadic 的基础上增补了很多互联网的新词

可以通过这个网页比较几个日语分词词典的差异

在对日语分词词典有了一定了解后,下面逐一介绍日语分词器

MeCab

MeCab 是京都大学信息专业和日本电信电话株式会社通讯研究所共同研究的项目,模型基于 CRF(条件随机场) ,基于 C++实现,主要作者是「工藤 拓」,是日本自然语言研究领域大拿,就职于 Google 负责日语输入法相关项目。

MeCab 主要特点有:

  • 不依赖特定词典,因此其他语言如中文、韩语也可以使用
  • 性能较好
  • 多语言接口
  • 整理了若干好用的词典

MeCab 无论在学术方面,还是工程方面,都是非常优秀的,可以看到其他很多日语分词相关的项目,或多或少都受到了 MeCab 的影响或使用了 MeCab 的算法、词典等。

Kuromoji

Kuromoji 由位于东京的 Atilika 公司开发,基于 Java 实现。目前已经捐赠给了 Apache 软件基金会,并内置在 Lucene 和 Solr 中作为默认的日文分词器。

Kuromoji 基本支持前文提到的所有词典,如果未指定的话,默认使用 ipadic。

Kuromoji 的分词算法基于 Viterbi Algorithm,因此可以看做是基于 HMM (隐马尔科夫模型) 的分词。

由于 Atilika 是一个纯商业公司,因此 Kuromoji 也更偏向作为日语分词的工程实现,作为 Java 开源项目,与主流的 Java 搜索项目如 Lucene,Elastic 有很好的匹配,工程方面比较规范,容易上手。而在学术方面的贡献就比较少了。

Juman++

JumanJuman++ 都是京都大学信息专业在 NLP 方面的研究成果,分词模型使用了 RNNLM(递归神经网络语言模型),即采用了深度学习技术。开发采用 C++ 实现,Github 页面也给出了已经训练好的模型。

Juman 除了采用自己整理的词典外,还引入了来自 Wikipedia 的词汇。 Juman 的输出除了标准的分词结果外,还可以输出词汇的分类,从而可以对句子做更好的标签和归类。

不过由于文档较少,想要使用 Juman 训练自己的模型或者更换自己的词典还是比较困难的,整体是一个比较偏学术的项目。

KyTea

KyTea 是由卡内基·梅隆大学的 Graham Neubig 主导研究的项目,实现语言是 C++, 算法方面融合了 SVM 和逻辑回归等多个模型,默认使用的词典是 UniDic。

作者的方向偏学术,因此 KyTea 更多也只是作为研究成果的展示,版本早已停止更新,实际应用的项目也较少。

Sudachi

Sudachi 由 Works Applications 公司开发,和 Kuromoji 非常类似,都是 Java 实现的商业开源项目,对比 Kuromoji, Sudachi 可以调整的参数更细致一些,默认词典同时包括了 UniDic 和 NEologd,算法使用的应该是 Lattice LSTM。

项目开源仅 2 年,更新维护比较勤快,官方提供了 Elasticsearch 插件,对开发者比较友好。

nagisa

nagisa 是 NTT DOCOMO 的「池田 大志」 个人开发的基于 RNN 的项目,训练好的模型可以直接使用 pip 安装后使用,不过由于是 Python 开发,运行效率上就远远比不了上述的 C++项目了。

nagisa 整体代码较少,并给出了完整的训练代码和语料库,如果是以学习日语 NLP 为目的的话,是一个不错的选择。

其他

  • janome 纯 Python 实现的 Lattice LSTM

日语分词器的横向比较

将以上所有介绍的日语分词器做一个横向比较,可以根据实际需要自行选择。

| | 算法/模型 | 实现语言 | 词典 | 处理速度 | ES 插件 | Lisence |
|–|–|–|–|–|–|–|–|
| MeCab | CRF | C++ | 可选 | 最高 | | GPL/LGPL/BSD |
| Kuromoji | Viterbi | Java | 可选, 默认 ipadic | 中 | 内置 | Apache License v2.0 |
| Juman++ | RNNLM | C++ | 自制 | 高 | 无 | Apache License v2.0 |
| KyTea | SVM 等 | C++ | UniDic | 中 | | Apache License v2.0 |
| Sudachi | Lattice LSTM | Java | UniDic + NEologd | 中 | | Apache License v2.0 |
| nagisa | Bi-LSTM | Python | ipadic | 低 | 无 | MIT |

References

2023-12-29
【转载】如何快速测试 Elasticsearch 的 Analyzer

【编者按】此文转载自 https://avnpc.com/。由于原网站链接已经失效,但此文内容非常有价值,故本博客对此文及其相关链接全文转载。本文著作权由 AlloVince 所有。

使用 Elasticsearch 搭建搜索引擎的过程中,免不了会反复测试 Analyzer 的效果,如果每次都建立一个索引,配置索引的 Analyzer,插入 Document,无疑效率会很低。ES 提供了 _analyze 接口,可以无需创建索引快速测试 Analyzer,推荐搭配 Kibana 中的 Dev Tools 一同使用。

测试 Tokenizer

1
2
3
4
5
POST _analyze
{
"tokenizer": "icu_tokenizer",
"text": "你好世界"
}

Response

1
2
3
4
5
6
7
8
9
10
11
12
13
14
15
16
17
18
{
"tokens" : [
{
"token" : "你好",
"start_offset" : 0,
"end_offset" : 2,
"type" : "<IDEOGRAPHIC>",
"position" : 0
},
{
"token" : "世界",
"start_offset" : 2,
"end_offset" : 4,
"type" : "<IDEOGRAPHIC>",
"position" : 1
}
]
}

测试 Character Filter

由于 Analyzer 必须指定一个 Tokenizer,因此可以使用Keyword这个特殊的 Tokenizer, 即不做任何分词,从而可以看到 Character Filter 的效果。

1
2
3
4
5
6
POST _analyze
{
"char_filter": [ "html_strip" ],
"tokenizer": "keyword",
"text": "<p>Hello <b>World</b>!</p>"
}

Response

1
2
3
4
5
6
7
8
9
10
11
12
13
14
15
{
"tokens" : [
{
"token" : """

Hello World!

""",
"start_offset" : 0,
"end_offset" : 26,
"type" : "word",
"position" : 0
}
]
}

测试 Token filter

1
2
3
4
5
6
7
8
POST _analyze
{
"tokenizer": "icu_tokenizer",
"filter": [{
"type": "stop", "stopwords": ["am"]
}],
"text": "I am ironman"
}

Response

1
2
3
4
5
6
7
8
9
10
11
12
13
14
15
16
17
18
{
"tokens" : [
{
"token" : "I",
"start_offset" : 0,
"end_offset" : 1,
"type" : "<ALPHANUM>",
"position" : 0
},
{
"token" : "ironman",
"start_offset" : 5,
"end_offset" : 12,
"type" : "<ALPHANUM>",
"position" : 2
}
]
}

测试已经创建的索引

而对于已经创建的索引,可以通过 ${index}/_analyze 接口来调用某个已经创建好的 Analyzer,或者预览某个 Field 对于文本的分析结果。 如创建如下索引

1
2
3
4
5
6
7
8
9
10
11
12
13
14
15
16
17
18
19
20
21
22
23
24
25
26
27
28
29
30
31
32
33
34
35
36
PUT my_index
{
"settings": {
"analysis": {
"analyzer": {
"my_analyzer": {
"char_filter": [
"html_strip"
],
"tokenizer": "icu_tokenizer",
"filter": [
"my_stop_filter"
]
}
},
"filter": {
"my_stop_filter": {
"type": "stop",
"stopwords": [
"am"
]
}
}
}
},
"mappings": {
"my_type": {
"properties": {
"title": {
"type": "text",
"analyzer": "my_analyzer"
}
}
}
}
}

调用这个索引中已经创建的 Analyzer my_analyzer

1
2
3
4
5
POST my_index/_analyze
{
"analyzer": "my_analyzer",
"text": "<p>I am <b>Ironman</b>!</p>"
}

或者预览 title 字段的分析结果

1
2
3
4
5
POST my_index/_analyze
{
"field": "title",
"text": "<p>I am <b>Ironman</b>!</p>"
}

而对于已经索引的数据,可以通过

1
GET /${index}/${type}/${id}/_termvectors?fields=${fields_name}

来查看实际存储的数据, 如

1
2
3
4
5
6
7
8
9
10
11
12
13
14
15
16
17
18
19
20
21
22
23
24
25
26
27
28
29
30
31
32
33
34
35
36
37
38
39
40
41
42
43
44
POST _bulk
{ "index": { "_index": "my_index", "_type": "my_type", "_id": 1} }
{ "title": "<p>I am <b>Ironman</b>!</p>" }

GET my_index/my_type/1/_termvectors?fields=title
{
"_index": "my_index",
"_type": "my_type",
"_id": "1",
"_version": 1,
"found": true,
"took": 2,
"term_vectors": {
"title": {
"field_statistics": {
"sum_doc_freq": 2,
"doc_count": 1,
"sum_ttf": 2
},
"terms": {
"I": {
"term_freq": 1,
"tokens": [
{
"position": 0,
"start_offset": 3,
"end_offset": 4
}
]
},
"Ironman": {
"term_freq": 1,
"tokens": [
{
"position": 2,
"start_offset": 11,
"end_offset": 22
}
]
}
}
}
}
}

2021-10-11
下一代 Bangumi Research 架构设计

Bangumi Research,即众所周知的 https://ranking.ikely.me,是一个展示 Bangumi 动画科学排名的网站。然而仅仅展示科学排名并不能充分填充这个 title 的 scope。事实上,我们希望它能做更多的事情,但是既有的网站架构限制了它唯一能做的事情就是展示科学排名。如果你查看过它的代码,你会发现它所做的事情仅限于从一个 Azure FileShare 里面定时读取最新的排名,如果发现排名更新了它就下载它并替换已有的排名。如果我想要做更多复杂的东西,比如说点开每个番组并查看它的 details,我是不是还得让它再读取一个文件?所以你可以看到这个网站的运作逻辑是非常简单的。

那么我希望 Bangumi Research 是一个什么样的网站?在我的理想中,它应该:

  • 展示科学排名
  • 展示每个番组的详细资料并包括一些有趣的数据(which requires extra data mining
  • 使用 tag 系统把每个番组连接起来
  • ……

但是目前为止,我还没有把 Bangumi Research 设计成一个可以登陆的客户端的打算。

经过若干周末的努力,下一代 Bangumi Research https://chii.ai 渐成雏形。chii.ai 来源于 Bangumi 的域名 chii.in。以下是这个新的网站的工程设计:

后端设计

用户访问 Bangumi Research 并不会发生写操作,而且用户最主要的目的就是访问我们的科学排名。除此之外,用户还可能会查看番组的详细信息,以及进行 tag 搜索。我不需要关心查看番组信息的 API,因为可以直接复用 Bangumi API。我主要关注以下三个 API 的设计(这只是概念上的展示,实际实现有所不同):

  1. /api/rank

    这个API 应该返回一个数组,其数据结构为

    1
    2
    3
    4
    5
    6
    7
    8
    9
    10
    11
    12
    [{
    int id;
    DateTime date;
    string name;
    string nameCN;
    int rank; // Bangumi原排名
    int sciRank; // 科学排名
    string type;
    int votenum; // 评分人数
    int favnum; // 收藏人数
    List<Tag> tags;
    }]

    这个就包含了番组一些基本信息以及连带的 tags。这么设计 API 纯粹就是 Bangumi API 没有返回番组 tags,所以我需要自己设计系统返回 tags。

    Tag 的数据结构为:

    1
    2
    3
    4
    5
    6
    {
    string Tag;
    int TagCount;
    int UserCount;
    double Confidence;
    }

    其中 TagCount是该番组被标注为该标签的次数,UserCount是所有参与用标签标注该番组的人数。Confidence是一个事先用某种机器学习算法算出来的值,它表示该标签隶属于该番组的确信度。用户实际在查看番组下的标签的时候,这个字段会用于隐藏某些标签。

  2. /api/tags

    这个 API 返回所有已有的 tags。其数据结构为:

    1
    2
    3
    4
    [{
    string Tag;
    int Coverage; // 该标签被标注到的番组个数
    }]
  1. /api/relatedtags

    这个 API 返回所有与被搜索标签有关的 tags。其数据结构同上。

  2. /api/searchbytags

    这个 API 返回所有与标签相关联的条目。其数据结构不再赘述。

那么我们需要数据库支持这样的操作。理论上两张表:Subject 表和 Tag 表。Subject 表存储所有番组条目信息,以番组 id 为主键。Tag 表存储标签信息。咋一看标签与条目属于多对多的关系,但是在上面的 API 设计中每个标签在不同的番组中有不同的 Confidence,这就使得我们要把标签与条目设计成多对一的关系:在 Tag 表中,每个标签由其标签内容和关联条目唯一确定。另外,Subject 表应该存放科学排名。但是在 Bangumi Spider 中科学排名被生成为一个单独的文件,为了兼容这种历史遗留问题我们就把科学排名也作为一张表,以一对一的关系与 Subject 表以外键连接。

chii.ai 继续沿用 ASP .Net Core 开发后端。有 Linq 和 EntityFramework 的技术支持使得开发体验良好。该 web server 提供若干 restful API 接口。

为了接入 Bangumi API,我另外使用了一个 node 服务把数据库 API 与 Bangumi API 整合成一个 unified API 接口。当然,我也可以用一个 nginx 服务器代理 Bangumi API 的服务,但是我真正的意图是想在前端使用 GraphQL。所以,这个 node 服务是一个 Apollo GraphQL Server,提供整合的 schema 和 API 接口。

前端设计

为什么要用 GraphQL?如果仅仅是“用 GraphQL 那套接口开发”这无疑就会降低我选择这个技术的可能性,毕竟它可能还没有 Restful API 方便。但是 Apollo GraphQL 的生态系统是如此之成熟,这使得选用 GraphQL + Apollo Client 成为一个非常有吸引力的选项。

我最喜欢 Apollo Client 对 Query 的自动缓存功能。想象一下当载入 https://chii.ai 主页面的时候,它首先会载入所有的动画排名。用户可能会点到别的页面再点回来,由于在第一次 Query 的时候我已经缓存了排名结果,我就不需要再向服务器发送一次请求了。听上去是不是很有吸引力?而 Apollo Client 使得这一切都 work under the hood!

这套缓存系统是如何运作的呢?Apollo Client 对每个发出的 Query 都做了缓存。这听上去挺荒唐,因为以每一个 Query 作为 key 结果直接作为 value 可能占用太多内存了。实际上,GraphQL 里面我们知道返回的数据结构。而不同的Query可能共享同样的数据结构,只不过内容不同。这时候 Apollo Client 将实际返回的数据的 id 和数据结构类型作为 key,返回的数据作为 value。在最理想的情况,每个数据结构里面的子数据结构都有 typename 和 id,这样可以彻底 normalize 所有返回的数据。以 typename 和 id 作为缓存的 key 和直接以 Query 本身作为 key 相比可以大大减少内存占用。

这里面还有一些精妙的东西。比如说你用查询排名的 Query 返回了一连串动画。然后用户点进去其中一个动画,这会发出第二个 Query 请求请求这个动画的 details。第一个 Query 返回动画这个数据结构的列表,第二个 Query 返回一个动画数据结构。由于这个动画具有唯一的 ID,它在缓存里的 key 也是唯一的。那么第二次 Query 的结果实际上会对第一次 Query 里面那个列表里面的动画进行一次更新——它会覆盖先前的值。这么做是自然的,因为两者同属一个数据结构,自然在后端返回的东西应该是一致的。如果你的后端不是这样(比如说某些 API 返回部分 field,另一些 API 又返回另一些 field,甚至同一 field 的内容还不同),那么你会遇到一些 bug。

这个缓存系统听上去挺先进。但是实际上我观察到它也有一些缺点:因为缓存要建 Hash Table,与不缓存的方案相比,它会带来一些时间上的 cost,甚至会造成页面卡顿!这在 fabric 架构下的 React 应用程序简直就是不可忍受的。

有了 Apollo Client 前端的开发其实还不够现代。我们还需要 graphql-codegen 辅助我们自动从 GraphQL Schema 生成可以执行的 Apollo Client Query。那么实际的开发流程就变成了:我需要什么 Query/Mutation,我先写出来,连带上会返回的 schema。我还需要一个 graphql-codegen 配置文件告诉它 server side schema 在哪里。通过一次 yarn generate,我就可以得到直接可以在 Javascript 里 import 的 typed schema,typed query/mutation。这样就可以作为 Typescript 开发的一个良好起点。

毫无疑问,前端全部使用 React Hooks 编写。我使用了微软下一代 UI 库 fluentui northstar。但是其使用还是不如 ant-design 方便,以至于我不得不把 Table 和 Pagination 两个组件按照 antd 的接口通用化了一下下。

整体架构

如上图所示,该站整体架构分成五个部分。首先,由 .Net Core 和 Postgers server 构成了后端逻辑的核心。其次,Apollo Server 作为 GraphQL server,运行在 Node 上,其接收前端请求并向真正的后端发出 API 请求。Apollo Server 实际上也封装了某些 Bangumi API,使得其成为一个 API 的 hub。为了减轻后端压力,Apollo Server 后接 Redis 作为 cache。前端是一个 React Application,部署在 Nginx 里面。该网站开发时使用 docker compose,部署在 Azure Kubernetes Service 上。

一些反思

这个架构是否就是最好的架构?恐怕并不是的。我的 GraphQL 服务器并不是原生的 GraphQL 服务,这其实造成了一些 latency:发送一个请求需要通过 GraphQL server 再转接到 .Net Core 的 server。这么做的背后逻辑其实是我想用 GraphQL 那一套生态系统开发,这就产生了后端既有 Restful API 也有 GraphQL 的情形。

如何避免这种用 node server 做 GraphQL server 转接的方式发生?最理想的想法就是后端所有逻辑使用 node 重写。但是我后端主要代码逻辑都在 .Net Core 里面,这样做太浪费时间了。

一种想法是,Apollo Server 所做的主要事情就是一个 resolver。我是否可以在前端使用一个 service worker,把 resolver 作为一个单独的进程,前端主进程只要与这个 service worker 相通信就可以了呢?这样实际上就把一段后端逻辑搬到了前端,而且后端又简化了不少。这需要我深入研究 service worker 的使用方式。

目前的想法暂时就是这些。前端的代码在这里,后端的代码在这里。各位看官如果还有什么问题,欢迎在评论里面提出。

2021-01-09
Review the year 2020

时光飞逝。当我看到 2019 年的痕迹的时候,比如假子的正统圣诞节的帖子,我还以为这些事情刚刚发生在昨天。2020 好像就这么快地过去了,还是……人们根本就不愿意提起它?

我确信 2020 年是一个非常重要的年份。正如《我爱XXX》的一九〇〇年一样。由于 COVID-19 的爆发,我们的生活方式在短期内被迫发生改变,而且在更将长远的将来,我们的整个世界将转向一个与我们之前所认识的完全不同的新世界。

虽然我在 2020 年初就已经更加向死宅的方向发展(比如说休假两个星期只待在家里),但是 work from home 这种新型的工作与生活相结合的生活方式我实在是无法接受。认识我的人都知道,我继承了法国人的生活方式,那就是 6 点准点下班!但是在家工作的话,根本就没有”下班”这种说法。在正常上班的时间段里,我可能还要买菜、做饭、睡觉之类的,一天过去了,到了 6 点我也不知道我今天具体完成了啥。更让我想念的是我放在公司里的单簧管,我一直想吹《利兹与青鸟》,但是只要公司不开门我就哪也去不了。幸运的是,二月末公司就有条件开放了。我成了第一批去公司上班的人。在公司工作,有乐器玩,令人舒适。

虽然我是研究机器学习出身,但是我远离机器学习已有多年,实际工作其实是前端。由于公司里的项目我已经比较熟悉,所以实际开发花不了我多少时间。但是前端技术每天都在进化,我自然也在考虑更好的工作机会。在三月末的时候,Yongdong 突然发了一封信,call for developers for Microsoft Teams,重点是要在苏州成立一个新 Team,主攻 Microsoft Teams 的前端和移动端开发,需要 React developer!众所周知,由于 COVID-19 在世界逐渐流行,远程成为了常态,自然这时候 call for developers 也是意料之中的。我立刻就去了这个 Team, as a short-term volunteer.

这个 Team 确实有我想要的东西:严格的编程规范和最先进的技术,当然也有 ping 一万年也 ping 不通的 code reviewer. 其实这个 Team 让我感觉到我是真的加入了微软。你可以感受到这个 Sharepoint group 的文化与我先前那个几近于机器学习创业团队的文化不同。我感觉每个人都很有组织,且乐于加入公司的各种活动。这样的正规军看上去比我原来的 Team 战斗力强多了。

不过既然是为了 COVID-19 临时加入,我切身感受到的是我们美国同事的压力。我们的美国同事非常专业,在 code review 的时候一眼就能看通这个 code 里面可能的问题。同时你简直无法想象为了帮助我们这些家伙会在当地凌晨三点和我们持续通话。在 DRI 的时候,这些同事会连 code review 都没法完成,因为疫情期间的 DRI 数量增长到了平时的 5–6 倍!然后白天他们还会开会、带孩子。我深深地为这些人的献身精神感到尊敬。正是有了这些人的持续付出,Microsoft Teams 的日活才能增长到 1.15 亿。同时,我也为自己在这一危难关头加入开发这么一个重大的项目而深感自豪。

所以当我看到有人开发了一个奋斗逼提醒 Hackathon 项目的时候我非常生气。这些人对微软简直一无所知,来微软估计也就是冲着微软没有强迫加班的文化。在微软有无数默默奉献的工作者,而且据我观察,越是资深的人为工作奉献的也就越多。照那个项目开发者的想法,9 点还在工作的人都是奋斗逼,那我们的美国同事又算什么?三更半夜开会的 PM 和 manager 又算什么?那些所有为了抗击 COVID-19 而加班加点工作的人算什么?只有这些人的持续推进,信任才会被构建,合作才有可能,项目也会随之完成它的目标。我时刻对这些人保持尊敬,并知道如果我站到那个重要的位子上,我也有必要为关心下属和团队而付出更多。

2020 年是与过去完全不一样的那个世界的第一年。即使中国大陆极大程度上控制住了疫情,口罩和健康码仍旧成为了我们日常的一部分。我最讨厌的就是,小区从年初至今只留一个入口,而以前我可以走侧门更快地去上班。虽然有那么些不便,我常常想念我在美国的朋友们,因为我知道他们所承受的不便远远多于我们。(可怜那些连 gym 都去不了的人。虽然是个死宅,我还是每周去两次 gym 的。)

《集合啦!动物森友会》也是这个新世界的常态之一。在不能见面的情况下,我与数位 Bangumier 和推友在线上完成了面基。我相信绝大部分人已经弃坑了这个游戏,但是我是一直玩到了年末。在此,我要感谢 mono 在我建岛初期送来了 30 个铁矿石解决了我把岛上所有石头都敲掉的燃眉之急;我要感谢 LukuYunnaSunny 等人数次光临敝人的小岛。感谢 Bangumi Switch 群为我去年带来的欢乐。遗憾的是,我试图还想联系更多的推友但是我没有他们的联系方式,或是他们压根就不理我的邮件。难道真的把我忘了吗?😢

但是这几年来更让我在意的是,公共卫生意义上的病毒虽然可以被消灭,一种传播学上的病毒却已经影响了每一个社交媒体的使用者。2020 年之所以荒谬,是因为社会同温层越发表现出拒绝交流的倾向。从蔡英文和韩国瑜的支持者还有拜登和川普的支持者身上你可以看到,这是一个全球性的问题。这种病毒甚至渗透到了 Bangumi,每当看到某些爱国小将挑起两岸三地对立的发言总让我精神紧张。

最严重的还是华人群体在疫情期间受的伤害。中国大陆有一些民调表明绝大部分国人认为中国为抗击 COVID-19 做出了卓越的贡献,世界感谢中国。哎,实际上西方社会的人民认为,病毒来源于中国,中国应该为疫情负主要责任。用脑子分析一下也就明白,大多数西方人连米都不会煮(比如饭煮了还要过一遍凉水之类的),对东方世界一无所知,但是 COVID-19 切切实实地影响了每一个人的生活方式,当人们要寻找一个罪魁祸首的时候,那当然是中国啦。我见到有想出国的同事,就会警告说新冠疫情之前的世界和之后的世界完全是不一样的。在国外的华人是这种认知割裂的首当其冲的受害者。我无法想象当疫情结束之后,再次走出国门的华人将会受到怎样的认知冲击。

最不缺这种同温层取暖的人的地方大概就是 Twitter 了。我一直在想一个问题:为什么 Twitter 成为了这么一个同温层取暖的地方?当人们在 Twitter 上看到一个异见者,讲道理要花很长时间,而 Twitter 只有 140 个字,所以发推的人反驳的最高效手段就是撰写一条博人眼球的论调挖苦讽刺,以最短的推文形成最有力的打击,而且这样还能获得不少 likes & retweets. 久而久之,为了维护自己的网络形象,发推的人也会逐渐迎合受众。我觉得挺悲惨的一件事情,特别是对于那些讨厌中国大陆而移民的推友,要么就发一些山山水水,要么就逮着黑中国的段子猛发。而我很少看见这些人描述自己的生活细节,说好的要融入他国社会呢?当然,既然是因为讨厌中国大陆而移居国外,为了贯彻自己的愿望,在身在国外之后还要以中国的丑闻作为自己活下去的精神支柱,这不就是在消耗他人的悲惨么。

这种生态,在 @MoeWowolf 的推文笔下显得淋漓尽致:

胖曾因为我嘲讽他对2016大选的预测而拉黑我;类似地,多多猫@AtlanticCat因为我嘲讽他对2020大选地预测也在前段时间拉黑了我。那么以多多猫为例:他本人就职于花街,欢呼富人和企业减税,至少十余年的港美金融经历,夏季度假已经把东南亚国家耍了个遍,于是从实然层面看,他是个标准的精英既得利益者

但是多猫的言论则狂呼MAGA,川普万岁,制造业回流,红脖最伟大左派精英最低贱,这一表态和他实然的生态位显然是矛盾的:锈带和hillbilly的故事如果花街是第二责任人那没有人敢称第一;他的做题家爬梯历史和他愤恨的大陆码农也完全同构。因此,肯定另有原因驱动多多猫做与他实际行为完全脱节的表态

反复运用上面的方法,结合田野日志,最终我们就能大致理出多多猫的底层动机:他的MAGA态度无关于他对美国政治左右的理解,而是一个狗哨:出于一些原因他认定川普上台可以毁掉中国,而且他认为在这个过程中首先毁掉的是一批当年他又恨又斗不过的两面人熟人,弄残这批两面人最能让多多猫觉得大快人心

当多猫认定川普能够为他借刀以实现他的隐秘愿望之后,他自然就为此大鸣大放,嘲笑白左黄左的段子一天比一天精进。但是,多猫站队的这个认知,脱离了实然,未能在现实世界中实现。许多其它的推特国师,为川普落选大发雷霆,也和多猫同构,愤恨于”我本来想整死的那个两面人现在居然照旧马跑舞跳”

其实这样近乎键盘cosplay的论战和党争,难道不正是劣根性的体现吗?通过谎称的言论和对借刀的幻想来掩盖自己隐秘的真实理想,也就意味着作为成年人你压根没打算自己为自己内心真诚的理想出力,而是用一些自以为机智的心机去当便乘人:多猫很可能从未向川普的campaign捐过款。

相应地,我们在推特的争吵中经常忽视一点:许多人的争吵不过是反复陈述己方的基础假设。较复杂的争吵包含了许多推理,可以用逻辑去分析,但基础假设不可推理:它的基石地位只能靠实验去验证,去打脸。凑巧,国师们的另一大能力就是,当实验打脸理论的时候,他们想到的不是改理论,而是改实验数据。

希拉里落选的时候,胖不觉得希拉里过于自满,而是俄国干预;川普落选的时候,多猫也不觉得川普的真人秀技巧之下毫无落地能力,而是民主党做票(做票大军中会有胖吗?)。如果这只是推友们的线上人生秀,那没什么关系。但如果这类认知被真的拿来做与现实生活相关的决定,必然会步入德匹下的结局。

玩这种线上人生秀的人还是多的。下场最惨的就是相信了这些人生秀的人。在公司里我觉得我和另一位同事发展得最为悲惨(不是因为我们很久没有 promote),而是其他同事都很快结婚买房子了而我们却什么都没有做。恰好这位同事总是看空房市,而那个时候的我也很相信 Twitter 上的野哨,我们就经常有共同语言。最近我并不这么想了,因为我逐渐发现,这些 Twitter 上面成天黑中国的家伙大多都买了房子–你要知道,买房子是可以被看做一种投资行为,意在赌上这个城市的发展,也就是说,他们选择了相信国运!有一位北京推友虽然没买但也看了三十多个房子,还整天怀疑房地产泡沫是否能持续–如果他真的相信自己的想法那么看三十多个房子干什么?当然还有我认识的一位推友同事,在 Twitter 上装得像个萌豚死宅似的,线下也是一派 Twitter 中文圈政治正确的论调,可是你知道他早就结了婚,生了孩子,还买了两套房么?他当然不会在 Twitter 上告诉你啦。这些人确实用行动选择了自己想要的世界。这都不算投共,那什么算投共?

这种网络与现实行为的脱钩让我感到深深的背叛。自从远离了 Twitter 之后我觉得我看世界真实了很多。虽然我们每天能看到不少观点,但是只有事实和逻辑才是经得住检验的,再加上金融市场。如果你试图去做一些投资,你很快就会从 Twitter 那种同温层抱团的社区毕业。

我马上就要三十岁了,虽然别离了学生时代的指点江山,但是真实的生活让我感觉更接地气,尤其是面对一个全新的世界的时候。那么,让我祝愿我在新的一年里能更加不惑于这个世界。

2020-01-03
Bangumi Spider 的历史遗留问题及基于 GitHub Actions 的解决方案

在我的 GitHub 页面里,Bangumi Spider 这个基于 scrapy 的爬虫恐怕是维护时间最久的东西了。从 2015 年为了写 Chi (Bangumi 的好友同步率——推荐系统)开始,这个东西就一直维护到今天。顾名思义,它的主要作用就是爬取所有的用户、所有的条目和用户标记条目的记录。今天,Bangumi Spider 的主要作用是服务于 https://ranking.ikely.me,每月爬取所有标记记录并计算动画排名。动画排名应该每个月第 1 + n 天会更新,n 取决于爬虫爬取速度。

Overall technical background of ranking.ikely.me

在此图中,左边是理想中的爬虫部分。定时任务首先每月向爬虫服务器 scrapyd 发送爬取请求,爬取后的数据以文本形式放在 Azure Blob 里。然而这时候还是 raw data,需要一个 postprocessing job 对爬取后的数据进行处理形成最后可以直接被 ranking.ikely.me serve 的数据。看上去很简单,是不是?然而在多年的技术发展中,该项目背负了沉重的技术债。

首先,在很久以前,这套东西为了能运行,爬虫服务和应用服务是在同一台虚拟机上的。第一版应用服务用的还是 flask + jinja 一套 SSR。postprocessing job 在 2016 年的时候还是我线下手动生成的,于是在之后的三年里 ranking.ikely.me 一直都没有更新是因为我忘记了线下生成数据的格式。终于在 2018 年,这一套应用用 dotnet core 重写了一遍,并封装成 docker image。scrapyd 被移出虚拟机封装成 docker image。于是该虚拟机就成了 ranking web application docker container instance + reverse proxy。同时为了能自动化生成排名数据,postprocessing job 被移到了该虚拟机里面。postprocessing job 运行时所需要的内存巨大,在去年大约要 10 GB 内存(在今年涨到了 14 GB)。crontab job 也被写在了该虚拟机里面。这一套系统运行了六个月,然后又不能自动更新排名了,因为 Bangumi 页面样式更新使得某些数据无法爬取。这里面存在的问题有:

  1. Azure 虚拟机高配置而长时间空转,浪费 budget;
  2. scrapyd container instance 在爬取数据过后还会重启,丢失已部署的爬虫,经调查有不法人士黑入该 instance;
  3. ranking web application 并非 continuously deployed,需要手动更新;

在理想的状况下,每一个部件应该自动化运行并充分利用现有 budget。而 GitHub Actions 的出现,为实现这种理想提供了便利(当然,需要指出的是,GitHub Actions 并未唯一实现这种自动化的手段)。在图的每一个被标记的部分都应该有自动化:

  1. crontab job 自动化
  2. 自动按需启动 scrapyd server 并在运行结束关闭
  3. 自动按需启动 postprocessing job 并在运行结束关闭
  4. 随着爬虫的更新,postprocessing job 也应该更新

即使不能做到 100% 自动化,能大幅降低服务空置率也是对宝贵 budget 的一种有效利用。此外,我希望将 ranking web application 移出虚拟机,用 Azure web service (Linux) + container 的技术去 serve,以降低成本。

GitHub Actions

GitHub Actions ,据官方描述,能够极大简化你的 CI/CD 流程。但实际上它能做的事情不仅局限于 CI/CD。在这篇文章中,我将介绍 Bangumi Spider 新添加的 GitHub Actions 如何实现自动化部署和排名自动化更新。

在 Bangumi Spider 里面,有一个叫做 scrapyd 的 folder 存放了 Bangumi Spider 专属 scrapyd dockerfile,其和普通的 scrapyd 不同之处在于使用 nginx 在访问前进行一次验证。在这个 workflow 里面,GitHub Actions 先 build docker image,再 publish 到 Docker Hub,最后更新 Azure container image。

正如上文所述,我不希望 scrapyd 在不执行爬虫任务的时候运行,所以我在最后关闭了它。在另一个定时 workflow 里面,我启动相应的 Azure container service,在线部署爬虫并运行爬取用户记录番组的数据和番组数据的 jobs。

另一个叫 postprocess 的 folder 存放了对已爬取进行后处理的 Dockerfile。其执行任务净是一堆脚本文件,以单机有限资源处理百万行数据。这是一个有艺术性的话题,但是我不想讲。针对这个 Docker image 的构建 workflow 被描述在这个文件里。相应地,我在另一个 workflow 定时启动相应的 Azure container service,运行完成就结束。

需要指出的是,在这里我发现了 GitHub Actions 是可以支持每次 commit 所触动的文件而出发 Actions 的——倒不如说我发现 Travis CI 不支持这项功能。这样我每次提交的时候我就可以通过检查修改的文件是否涉及 scrapyd 和 postprocess 两个 folder 而 conditionally update docker images。就这项功能而言,我觉得 Travis CI 已经完全落伍了。

Azure Web App Service

Azure 提供 App Service 的服务,并附带一个 Azure 的证书,而且也可以绑定到自己的域名。关键是这个服务的价格比自己 host 虚拟机要便宜(如果用 Basic plan 的话)。App Service 最好的地方在于支持 docker image 和 docker-composed images,于是我把 dotnet core 的服务也使用 docker image 部署在其上。https://ranking.ikely.me 使用 CloudFlare 做 CDN 并由其提供证书,关于如何把 CloudFlare 的证书导入到 Azure App Service 的操作参见这篇文章

Achievements

通过这么一番操作,我们已经:

  • 100% 实现了全自动无人干预更新排名(除非 Sai 老板再次更新 Bangumi 页面导致爬虫需要连带更改)
  • Conditionally update docker image
  • 大幅削减预算:从每月七十多刀的虚拟机削减到十四刀左右。
  • 增强了 scrapyd 的安全性。

2019-10-26
My Kaggle Days China experience

I have been a Kaggle fan for a long time. A community of data scientists and engineers devoting for pioneer data science practice has always been attractive for me. Though I’m not a dedicated Kaggler, I would still devote several month’s weekends per year to some Kaggle competitions after work, to grasp the spirit of dedication and religious attitude. That’s why I registered it the first time when I received the registration notification email.

Besides the lectures and GrandMasters, another thing that specifically attracts me is the offline data science competition. I have been curious about the authentic ability of offline coding, since in my opinion, most Kagglers online are fed by public Kernels. What would be their real performance without Kernels? Though I’m only a linear model Kaggler, I’m certain that I am somewhat experienced than others in feature selection, so there might be a chance for me to win.

I checked the previous Kaggle days before this event, and all the offline competitions are about tabular data. So I tried to get me familiar with all common EDA APIs and code snippets of pandas feature generation and scikit-learn compatible cross-validation. I know deeply that my skills in traditional machine learning cannot achieve high place on leaderboard in the age of deep learning, so I invited one of my colleague, Lihao, who is a deep learning expert, to join me.

DAY 1

Opening of Kaggle Days China

The first day of the event was all about lectures and workshops. There were several interesting workshops for you to attend, but you must register first. The first thing I regreted was that there was an lecture about LightGBM that I really wanted to attend, but it conflicted with a workshop about modeling pipeline. In fact, I attended that lecture when it was about to end, and even so, I still learned something insightful from that. I may need to go review the lecture videos later.

Someone mentioned before that all the things to do when attending a technical meeting is to chat with people: no need to attend lectures, no workshops, just communicating. And I have to say this is the best part of the Kaggle Day. I did talk with a lot of people. However, I was still too shy during the meeting because it wasn’t me who tried to get to know others first. I have to say everybody in Expert group have their domain knowledge, not all of them are necessarily experienced Kagglers, but they know AI industries in China very well. As a SDE working in a small city, Suzhou, I have not felt this excitement of communicating with industry experts for a long time ever since I left Beijing in 2015.

Announce of competition title on day 2

At the end of the day, the organizer disclosed the title of tomorrow’s data science competition. Though I had expected that it should be another tabular data competition, the title indicated that it would be a computer vision competition. It reminds me of a previous competition classifying astronomical objects, but it may not necessarily be in the same form. Having no practical knowledge of contemporary computer vision, in which deep learning has dominated, I regretted I didn’t follow my domestic advisor Lianwen Jin well when I was in graduate school. My working experience also could not contribute to this competition since I’m working in NLP group. Fortunately, when we were about to leave, a guy came to us, asking if he can join us. He said he had some CV background. Perhaps this was the best news I received that day, so I was grateful for him.

DAY 2

I had decided from yesterday’s night that if the competition was really a computer vision competition, I would resort to fast.ai. I leaned about it this summer, and this was the only thing I know how to use in modern deep learning based CV. It turned out it is. This competition requires us to classify images into two classes, so it’s a typical binary classification problem.

CV requires GPU equipped machines, and on the night before competition, we were required to configure our machines on specified service provided by UCloud. It was actually a Jupyter Notebook backended by 8 GPUs. However, without proper configuration, that machine is almost unusable. It has tf 2.0 alpha installed, not final release version nor stable tf 1.14. So Lihao spent a lot of time configuring the machine in the morning.

I originally thought that one need to perform EDA and do proper train/test split first, but soon I discarded this idea for this CV competition. However, Williame Lee, the guy I mentioned above, spent some time inspecting data first. He tried to find out some patterns of the image. But in my opinion, features are extracted automatically by deep neural networks, and even if I concluded some patterns, we don’t know where to feed it if I use deep neural network to extract feature.

Kaggle offline competition ongoing

The core spirit of fast.ai is using pre-trained networks to classify images, and fine-tune them at the end. This turned out to be a very successful idea. I used the whole morning to build the pipeline, and it works! My first classifier, which is using ResNet34 as pretrained model, works as well as baseline. Later, Lihao trained this model further to push it to 0.85, and we tried several other models like ResNet18 and ResNet50. Even NN simple as RetNet18 can achieve good results at 0.82 after fine-tunning. Williame also developed a neural net using mobile net which is achieving 0.81 on public leaderboard.

Meanwhile at the same time, Fengari shared his 0.88 baseline, which is using EfficientNet. You can imagine that this fed many competitors attending this competition. Lihao then switched to this new baseline and adapted its cross-validation scheme. At last, we merged our three ResNet pretrained models and two EfficientNet adaptations as final result. That placed us at 17th over the whole leaderboard (34 teams). Not too bad for me as my first CV competition experience!

Day 2’s experience is like thrown in to a swimming pool (I don’t know how to swim, really) and learn to swim by myself. I have successfully trained a deep neural network targeting computer vision for the first time. Now I’m not fearing CV any more!

The organizer soon announced the winners, who are sitting in-front of us face-to-face during the whole competition. They are using multi-tasking to improve our model, which is a key technique that Williame implied in the morning. Their solution is here: https://github.com/okotaku/kaggle_days_china

Before this Kaggle Day, my ambition was to stand on the winning stage. But unfortunately, I still have many things to learn to achieve this goal. I asked Lihao later if this is the ideal tech venue that he likes, his answer was no, but he still prized the core spirit of this Kaggle community. I hope next year, I would find someone who bear the same mindset as me and debut together. If I could cross-dress the next time, the best!

2019-08-01
Saving the React novice: update a component properly

Front end development in React is all about updating components. As the business logic of a webpage is described in render() and lifecycle hooks, setting states and props properly is the core priority of every React developer. It relates to not only the functionalities but also the rendering effectiveness. In this article, I’m going to tell from the basics of React component update, then we will look at some common errors that React novice would often produce. Some optimizing techniques will also be described to help novice set up a proper manner when thinking in React.

Basics

A webpage written in React consists of states. That is to say, every change of a React component will lead to a change in the appearance of a webpage. Since state can be passed down to child components as props, the change of state and props are responsible for the variation of view. However, there are two key principles pointed out by React documentation:

  1. One can not change props directly.
  2. One can only update state by using setState() .

These two constraints are linked with how React works. React’s message passing is unidirectional, so one can not mutate props from child component to parent component. setState() is related to a component’s lifecycle hooks, any attempt to change state without using setState() will bypass lifecycle hooks’ functionality:

React lifecycle hooks diagram, referring to http://projects.wojtekmaj.pl/react-lifecycle-methods-diagram/

However, during my development experiences, I have observed numerous cases where these two principles are broken. A major part of those misbehaved patterns can be traced back to the selective ignorance of a important property of JavaScript.

Assignment: reference or value?

Assignment to const value

Let’s look at the example above. We all know const allows us to declare a variable that cannot be assigned a second time, so there’s no doubt why when we are trying to assign temp with 3 a TypeError is thrown. However, const does not imply constness to the internal field of an object. When we are trying to mutate the internal field of obj , it just works.

Assigned object is an reference to original

This is another common operation. From the script we know a and b are two non-object variables, and re-assignment to b leads to a !== b . However, when we are trying to assign d as c, which is an object, mutating the internal field does not change the equal relationship between the two. That implies that d is a reference of c.

So we can conclude two observations from the above:

  1. const does not mean constness to object’s field. It certainly cannot prevent developer from mutating its internal field.
  2. Assigning an object to another variable would pass on its reference.

Having acknowledged of the above, we can go on to the following code:

As you read the code, you are clearly aware of the intention of the author: onChange is a place where this.state is changed: it is changed according to incoming parameters. The author get a copy of original data first, then modify its value, then push to nextData. At last, the author calls this.setState to update.

If this code’s pattern appears in your projects and it works, it is normal. According to React’s component lifecycle, the this.state.data is changed to nextData , and it will eventually effect the render()‘s return value. However, there are a series of flaws in this code that I have to point out. If you fully understand and agree with the two observations I mentioned above, you will find the following points making you uncomfortable:

  1. data=props.data in line 5 is assigning this.props.data‘s reference to this.state.data, which means changing this.state.data directly COULD mutate this.props.data.
  2. prevData is assigned as a reference to this.state.data in line 10. However, as you read through the code, you will realize that this is not the real intention of the author. He wants to “separate” prevData from this.state.data by using const. However, this is a totally misunderstanding of const.
  3. In line 13, each item in prevData is mutated by assigning its field a to another value. However, as we mentioned before, prevData is a reference to this.state.data, and this.state.data is a reference to this.props.data. That means by doing so, the author changed the content of this.state.data without using setState and modified this.props.data from child component!
  4. In line 18–20, the author finally calls setState to update this.state.data. However, since he has already changed the state in line 13, this is happening too late. (Perhaps the only good news is that this.state.data is no longer a reference to this.props.data now.)

Well, someone may clam: so what? My page is working properly! Perhaps those people do not understand the functionalities of lifecycle hooks. Usually, people write their business logic in lifecycle hooks, such as deriving state from props, or to perform a fetch call when some props changes. At this time, we may write like the following:

1
2
3
4
5
componentDidUpdate(prevProps){
if (this.props.data !== prevProps.data) {
// business logic
}
}

Every time a component finished its update, it will call componentDidUpdate. This happens whenever setState is called or props is changed.

Unfortunately, if a novice developer unintentionally mutated this.state or this.props , these lifecycle hooks will not work, and will certainly cause some unexpected behaviors.

How to make every update under control?

If you are an lazy guy and like the natural thinking of using a temporary variable separating itself from original, as I displayed above, you are welcomed to use immer. Every time you are trying to update state, it would provide you a draft, and you can modify whatever you want on that before returning. An example is given by its documentation.

However, you should know that the most proper way to update a state field without modifying it directly through reference is to perform a clone. The clone sometimes needs to be deep to make sure every field is a through copy of the original one, not reference. One can achieve that goal by deepClone from lodash. But I do not recommend that since it may be too costy. Only in rare cases you will need deepClone.

Rather, I recommend using Object.assign(target, …sources) . What this function does is updating target by using elements from sources. It will return target after update is complete, but its content will be different from those of sources. So updating object should be like:

1
const newObj = Object.assign({}, this.state.obj, {a: 1})

The actual programming can be more easy: you should know that there’s spread syntax available for you to expand an object or array. Using spread syntax, you can easily create an new object or array by writing:

1
2
const newObj = {...this.state.obj}
const newArray = [...this.state.data]

That allows you to copy the original content of an object/an array into a new object/array. The copy behavior at this point is shadow copy, which means only the outer most object/array is changed, and if there’s an object inside the field of the original object, or an object at some position of an index, that inner object will be copied as a reference. This avoids the costy operations inside deepClone. I like this, because it gives you precise control on what you need to change.

So the proper component I gave above should be like this:

Some further advice

I would suggest all components you write from now on should be changed to React.PureComponent. This is no different from React.Component except it has its default shouldComponentUpdate function: it performs a shadow comparision of its states and props to check whether it should be updated, meanwhile React.Component would always return true if you do not provide custom logic. This would not only improve page’s performance but will also help you realize the unexpected rendering when you made the mistake I mentioned above.

If you need similar functionality on function components, you can try React.mono() which is available since React 16.6.

2019-07-10
RegExp.test() returns true but RegExp.exec() returns null?

Consider the following Javascript script:

1
2
3
4
5
6
7
8
const regex = /<(\w+)>/g
const testString = "<location>"
// Check whether testString contains pattern "<slot>"
// If yes, extract the slot name

if (regex.test(testString)) {
console.log(regex.exec(testString)[1])
}

It seems to be a perfect logic extracting the tag name of the tag string: one uses test to prevent the situation that testString does not match. However, it would throw an error:

1
TypeError: regex.exec(...) is null

It just violates our intuition: the string do match the regex, but it could not be matched. So why does this happen?


As MDN has stated, invoking test on a regex with flag “global” set would set “lastIndex” on the original regex. That lastIndex allows user to continue test the original string since there may be more than one matched patterns. This is affecting the exec that comes along. So the proper usage of a regex with “g” flag set is to continue executing the regex until it returns null, which means no other pattern could be found in the string.

This behavior is sometimes undesirable, since in the above scenario, I just want to know whether the string matches the predefined pattern. And the reason I don’t want to create the regex on the fly is to save the overhead of creating an object.

One obvious solution is to remove “g” flag. But sometimes, we do want to keep the “g” flag to find if a string matches the given pattern, and we don’t wish to modify the internal state of regex. In that case, one can switch to string.search(regex) , which would always returns the index of first match, or -1 if not matched.

2019-05-03
Write a reusable modern React component module

今天这篇文章主要讲怎么用一种科学、优雅的方式开发一个可复用的 React Component,其实实际上不仅限于 React Component,如果想要写任何一个可以被 npm install 的模块都是可以适用的!

听起来很简单?这个事情的结论是可以用一句话概括的,在我研究了半个月之后发现确实是的(,我们走了一些弯路)。为了照顾那些大忙人,可以直接下拉到文章最底端,使用我推荐的库就行了,我可以保证那个库和它背后的模板是 best practice。

有人说,既然你已经给出了答案,那么还要读这篇文章干什么呢?因为写一个 js module 有很多种写法。可是要做到可复用还要做一些额外的工作。以最简单的方式,我写一个 mymodule.js,在最下方写上 export default MyModule,然后在另一个调用其的文件里面写上 import MyModule from ‘./mymodule’ 这个事情就算完了。我可以对外宣称,这是一个可复用的组件!真的吗?

我担心的事情有:

  1. 这个组件依赖于 React, React-dom,怎么让用户知道他们也必须用这两个东西呢?
  2. 如果用户在自己的应用上面用了 React 16.2,但是我的组件使用了 React 16.8,用户在使用我的组件的时候会出现兼容性问题吗?会不会为了兼容性问题而装两个版本的 React 呢?
  3. 用户调用我的包,是通过文件直接调用的,怎么才能把我的包放在 node_modules 里,即,通过 npm install 的形式安装?
  4. 我的包使用了某些先进的语言特性。通过文件直接调用是无法通过 babel 转义为较低版本的 Javascript 的。甚至,用户都不能通过 import MyModule from './mymodule' 的形式调用!

但是在使用 npm 上面的包的时候,我似乎完全不用担心上面这些问题。所以为了写一个可复用的模块还需要某些额外的操作。

第一个实例

如果我们在 Google 上搜索 “write a reusable react component module” 等词语,我们可以找到一些号称自己是模板的东西,比如说这个 rinse-react,它是一个可以作为 boilerplate 的项目。让我们去看看它为了让 rinse-react 模块化做了哪些工作。

如果你去你的任何一个项目里的 node_modules 里看,你会发现 package.json 至关重要,因为它指定了一个模块的入口点,那就是 main 这个 field。对于 rinse-react 这个模块,其入口点是 dist/rinse.js,可以猜出这个文件是经由 webpack 打包后输出的。

于是我们打开 webpack.config.js, 里面的输入和各种 loader 同正常的 SAP 配置大同小异。但是需要重点指出的是 output.libraryTarget,它的含义就是把 src/index.js 里的返回值以怎样的形式作为模块输出。这里面要指定的值与模块会被怎样调用有关。我们除了 import MyModule from 'mymodule' 这种方式,还可能以 var MyModule = require('mymodule') CommonJS 的形式调用,也可能会以 define('MyModule', [], function() { ... }) 的 AMD 形式调用。为了兼容所有的调用方式,在 rinse-react 里面设置 output.libraryTarge = 'umd' ,这样被 webpack bundle 之后的模块就可以以任何一种形式调用。

对模板的优化

一部分人可以欢呼了, 因为看起来找到了一个可以拿来用的模板。但是有没有发现其中的问题?

  1. 它看上去也把当前版本的 react, react-dom 和 styled-components 打包了进去,增加了库的大小;
  2. 它实际上是先通过 babel 的转译再被下游应用调用的模块,所以下游应用使用 ES6 的 import 的时候,并不会有真正的 tree-shaking (所谓 tree-shaking,就是 ES6 通过分析 import 和 export 判定哪些代码被真正地调用,从而在执行前就把不被调用的代码给去掉)。
  3. 我也没有必要在下游应用 bundle 的时候对源模块进行二次 bundling。

对于第一个问题,在 package.json 里面可以使用 peerDependencies 解决。在 peerDependencies 里面的东西,应该是下游应用也同时依赖的东西。如果你不把依赖放在peerDependencies 而是放在 dependencies 里(就像 rinse-react 一样),它们就会成为私有的依赖。

那么自然地,有没有 peerDependencies 在模块里的版本和下游应用的版本不匹配的情况呢?当然会有。这时候如果出现了不可兼容的版本,npm install 的时候会有提示,而在实际开发中,我发现安装的是最高指定版本。

但是我们还没有解决如何真正地实现 tree-shaking 特性。幸运的是,最佳实践告诉我们,rollup.js 正是为了解决这一问题而来的。rollup 也是一种打包工具,但是和 webpack 的目的不同,rollup 的初衷是为了尽量把模块的依赖打平并且高效地利用 tree-shaking。从这一出发点来讲,编写可复用的模块应该使用 rollup.

在 rollup 打包的过程中,在 package.json 里面会提供两个入口:传统的 main 指向打包后兼容 UMD 的打包内容;前卫的 module 应该会指向一个类似于 main.es.js 的文件:它使用 ES6 的先进特性。这样,在一个实际应用试图 import 一个模块的时候,它会先查看 package.json 是否有 module,如果有的话就以 module 指向的文件作为入口,避免了 babel 转译并且最大限度利用 tree-shaking. 如果应用在 build 的时候不支持 module,就 fallback 到 main 所指向的 UMD.

一个基于 rollup 的库模板

由于很偶然的原因,在我试图研究 Ant Design 如何开发出如此优雅的组建库的同时,我发现了一个可以自动生成基于 rollup bundling 的库模板生成器。这个东西基本上解决了我上面所有的困惑。我诚邀各位试一试这个 create-react-library,并且劝退那些想要研究 Ant Design 的人,他们家自己研发的 rc-init 连文档都没有且都没有人维护的。

当然,在我使用这个模板生成器的时候,他们只能生产出基于 babel 6 的配置。为了与实际开发环境匹配,我又手动修改到了 babel 7。

剩下的问题

看来怎样开发一个 js 库这个问题到现在算是解决了。但是这样的库真的能与 Ant Design 相媲美了吗?在实际下游应用开发过程中会有按需加载的需要,为了能让用户按需加载 Ant Design,babel-plugin-import 应运而生。怎样优雅地面向按需加载开发是一个需要研究的问题。

参考文献

  1. Rinse-react: https://rinsejs.io/
  2. Webpack: output.libraryTarget: https://webpack.js.org/configuration/output/#outputlibrarytarget
  3. Writing Reusable Components in ES6 https://www.smashingmagazine.com/2016/02/writing-reusable-components-es6/
  4. CommonJS vs AMD vs RequireJS vs ES6 Modules https://medium.com/computed-comparisons/commonjs-vs-amd-vs-requirejs-vs-es6-modules-2e814b114a0b
  5. 你的 Tree-Shaking 并没什么卵用 https://juejin.im/post/5a5652d8f265da3e497ff3de
  6. Webpack and Rollup: the same but different https://medium.com/webpack/webpack-and-rollup-the-same-but-different-a41ad427058c